이번 글에서는 UIKit의 UIPageControl을 SwiftUI에서 사용하는 방법에 대해 알아볼 것입니다. 이전 글과 이어지는 내용이기 때문에, 이전 글을 먼저 보고 오셔야 합니다. 😎
이 글은 Swift Tutorials의 Interfacing with UIKit을 기반으로 작성되었습니다.
State와 Binding으로 Page 추적하기
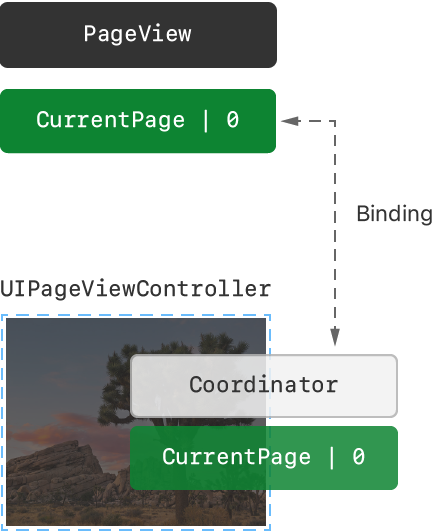
UIPageControl을 사용하여 지금 보고있는 페이지가 몇 번째인지 알기 위해서는, UIPageViewController가 제공하는 정보를 사용해야 합니다. 그리고, 이 정보를 서로 연결하기 위해서는 @State와 @Binding을 적절히 사용해야 합니다.
이 작업이 완료되면 View의 관계는 위 그림과 같은 형태로 구성됩니다.
PageViewController에 currentPage 추가하기
PageViewController에 currentPage라는 변수를 추가하는 것으로 시작하겠습니다. 이 변수는 @Binding 속성으로 만들어야 합니다. 그리고 setViewControllers(_:direction:animated:) 메서드를 호출하는 곳에서 0을 currentPage로 수정합니다.
1
2
3
4
5
6
7
8
9
10
11
12
struct PageViewController: UIViewControllerRepresentable {
    @Binding var currentPage: Int

    .
    .
    .

    func updateUIViewController(_ pageViewController: UIPageViewController, context: Context) {
        pageViewController.setViewControllers(
            [controllers[currentPage]], direction: .forward, animated: true)
    }
}
UIPageViewControllerDelegate 구현하기
PageViewController의 Coordinator에는 UIPageViewController의 Delegate가 구현되어있지 않습니다. 현재 페이지의 위치를 가져오고 싶다면, UIPageViewControllerDelegate를 구현해야 합니다.
아래 코드를 참고하여 Coordinator 선언부에 UIPageViewControllerDelegate를 추가하고, (_:didFinishAnimating:previousViewControllers:transitionCompleted completed: Bool) 메서드를 구현합니다.
1
2
3
4
5
6
7
8
9
10
11
12
13
14
class Coordinator: NSObject, UIPageViewControllerDataSource, UIPageViewControllerDelegate {
    .
    .
    .

    func pageViewController(_ pageViewController: UIPageViewController, didFinishAnimating finished: Bool, previousViewControllers: [UIViewController], transitionCompleted completed: Bool) {
        if completed,
            let visibleViewController = pageViewController.viewControllers?.first,
            let index = parent.controllers.firstIndex(of: visibleViewController)
        {
            parent.currentPage = index
        }
    }
}
그리고 makeUIViewController(context: Context) 함수가 있는 곳으로 이동해서 pageViewController의 delegate를 설정해줍니다.
1
pageViewController.delegate = context.coordinator
PageView에 currentPage 추가하기
다음으로 PageView에도 currentPage 변수를 추가하는데, 이때 이 변수는 @State 속성으로 만들어야 합니다. 왜냐하면 이 변수가 변경될 때 마다, UIPageControl의 Page 위치를 갱신해야 하기 때문입니다.
PageViewController를 초기화하는 부분에서 $ 연산자를 사용하는 것에 주의하면서, 아래 코드를 추가합니다.
1
2
3
4
5
6
7
8
9
10
11
struct PageView<Page: View>: View {
    @State var currentPage = 0

    .
    .
    .

    var body: some View {
        PageViewController(controllers: viewControllers, currentPage: $currentPage)
    }
}
$currentPage를 PageViewController로 넘겨주게 되면, @Binding으로 선언 된 PageViewController의 currentPage와 서로 연결됩니다. 그럼 UIPageViewController를 스와이프하여 Page가 변경될 때 마다, PageView의 currentPage가 업데이트 될 것입니다.
UIPageControl을 대신하는 PageControl 만들기
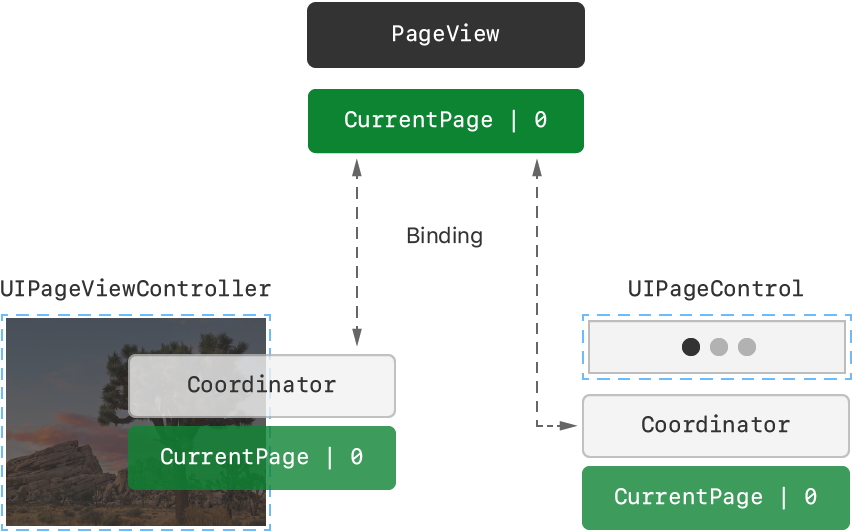
UIKit으로 만들어진 UIPageControl을 사용하기 위해, 프로젝트에 PageControl.swift 라는 이름의 SwiftUI 파일을 추가합니다. 그리고 아래 코드를 참고하여 UIViewRepresentable 프로토콜을 따르는 PageControl을 추가합니다.
1
2
3
4
5
6
7
8
9
10
11
12
13
14
15
16
17
import UIKit

struct PageControl: UIViewRepresentable {
    var numberOfPages: Int
    @Binding var currentPage: Int

    func makeUIView(context: Context) -> UIPageControl {
        let control = UIPageControl()
        control.numberOfPages = numberOfPages

        return control
    }

    func updateUIView(_ uiView: UIPageControl, context: Context) {
        uiView.currentPage = currentPage
    }
}
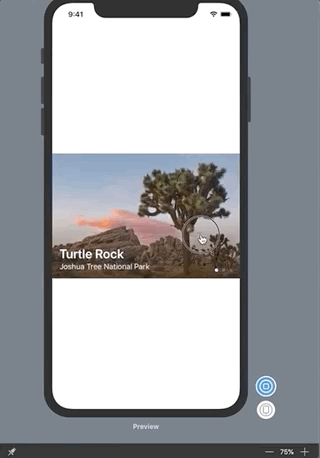
다음으로 PageView.swift의 body를 아래 코드로 변경합니다. body를 변경하면 이미지 우측 하단에 UIPageControl이 추가됩니다.
1
2
3
4
5
6
7
var body: some View {
    ZStack(alignment: .bottomTrailing) {
        PageViewController(controllers: viewControllers, currentPage: $currentPage)
        PageControl(numberOfPages: viewControllers.count, currentPage: $currentPage)
            .padding(.trailing)
    }
}
이제, 페이지 뷰 컨트롤러를 스와이프 하면 페이지가 이동하면서 PageControl의 위치도 같이 움직이는 것을 볼 수 있습니다.
Coodinator로 Target-Action 구현하기
UIPageControl은 Delegate 패턴이 아닌 target-action 패턴을 사용하여 사용자의 터치 이벤트를 처리합니다. 이 패턴을 구현하는 방법은 DataSource와 Delegate를 Coordinator에 구현했던 방법과 매우 비슷합니다.
먼저, PageControl의 내부에 Coordinator와 makeCoordinator()를 추가해줍니다. PageViewController에서 했던 것과 같은 방법이죠.
여기서 추가된 Coordinator는 @objc로 선언된 메서드가 있습니다. 이 메서드를 UIPageControl의 target-action 동작에 사용 할 것입니다.
1
2
3
4
5
6
7
8
9
10
11
12
13
14
15
func makeCoordinator() -> Coordinator {
    Coordinator(self)
}

class Coordinator: NSObject {
    var control: PageControl

    init(_ control: PageControl) {
        self.control = control
    }

    @objc func updateCurrentPage(sender: UIPageControl) {
        control.currentPage = sender.currentPage
    }
}
다음으로 valueChanged 이벤트가 발생했을 때, UIPageControl의 타겟으로 coordinator를 지정하고, 실행 함수로 updateCurrentPage(sender:) 메서드를 지정해줍니다.
1
2
3
4
5
6
7
8
9
10
func makeUIView(context: Context) -> UIPageControl {
    let control = UIPageControl()
    control.numberOfPages = numberOfPages
    control.addTarget(
        context.coordinator,
        action: #selector(Coordinator.updateCurrentPage(sender:)),
        for: .valueChanged)

    return control
}
페이지뷰를 스와이프 해보고, PageControl를 터치해보세요. 이미지가 바뀌고, PageControl의 위치가 업데이트 된다면 모든 작업이 완료 된 것입니다. 🎉
마치며
지금까지 2개의 글을 통해 페이지를 지원하는 View를 만들어 보았습니다. 이 과정에서 UIKit을 SwiftUI에서 사용하는 방법에 대해서도 알 수 있었고, Coordinator, State와 Binding의 사용법에 대해서도 알 수 있었습니다.
그리고 Apple의 SwiftUI Tutorial은 SwiftUI 입문자에게 매우 큰 도움이 되기 때문에, 꼭 한번 따라해보시는 것을 추천합니다.
그럼 여기서 마치겠습니다. 읽어주셔서 감사합니다! 😉